CICD with Gitlab
Hello DevOps Enthusiasts! We are back with an article which shows an end-to-end CICD integration of a Java Springboot application using Gitlab.
🙏 Before we get into the article, Please like our Facebook page and follow us on twitter by using the links on the top right corner of this page! 🙏
Here is what we are are going to learn as part of this article.
- About GitLab
- GITLAB Pipeline stages of our application
- Build Stage
- Code Analysis Stage
- Containerization Stage
- Deployment Stage
- Conclusion
About GitLab
GitLab is a web-based Git repository hosting service. It offers all of the distributed revision control and source code management (SCM) functionality of Git as well as adding its own features. It is an open source tool that combines the ability to develop, secure, deploy and operate software in a single YAML based file. The YAML based CICD approach makes it easy to read, understand, develop and maintain the build and deploy configuration for the application compared to other CICD tools like Jenkins.
Features of Gitlab:
- Version control and repository management based on Git
- Issue management, bug tracking and boards
- Continuous Integration/Deployment tool (GitLab CI/CD)
- Service Desk which is a ticketing system provided by GitLab
- GitLab Wiki
- Integration with various IDEs like Visual Studio, Eclipse, IntelliJ, etc.
- Integration with various DevOps tools like JIRA, Jenkins, Slack, Docker, Kubernetes, etc.
Basic structure of Gitlab yaml file
Here is the code base which we are using in this article.
We can see a YAML file with the name.gitlab-ci.yml at the root of the repository. In the beginning of this file, we can see the list of stages we are going to use for this demo. Here we have 5 stages which will be executed one after the other. The environment variables which are common across all the stages can be defined under the variables section. In each stage, we can see the steps to execute under the script path. The gitlab spins up a new container to execute the script and we can give the image name in the image field.
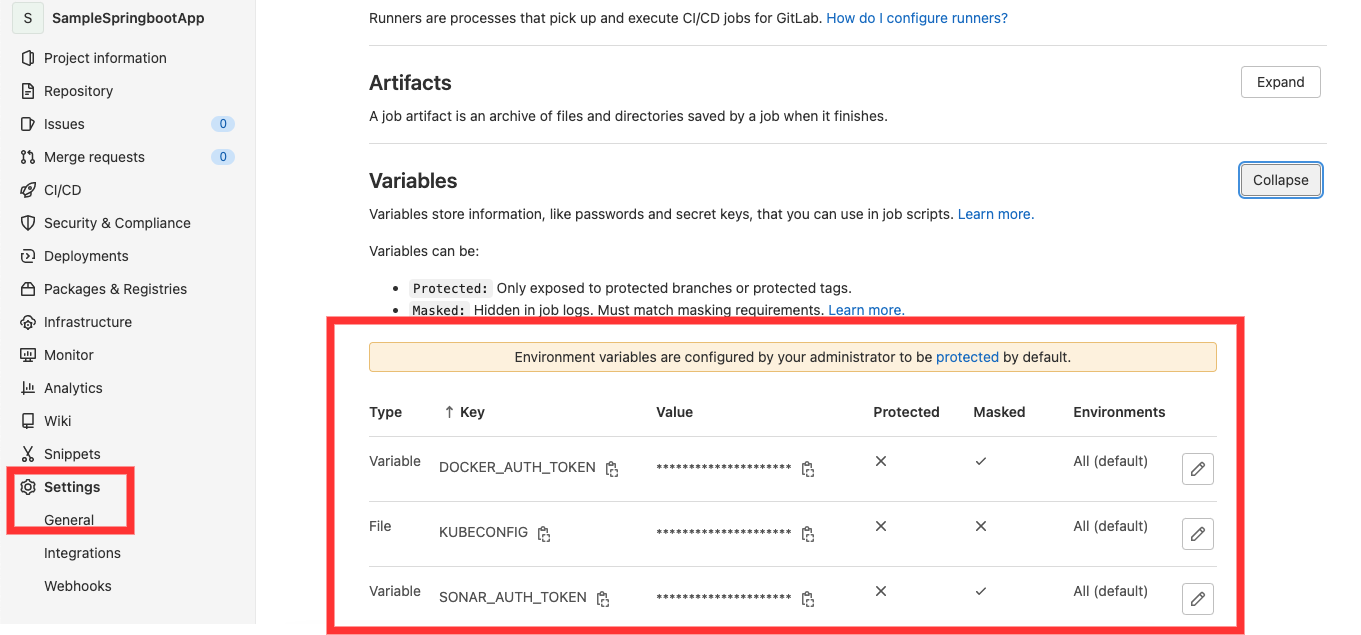
We can create the strategy for your app and GitLab runs the pipeline according to what we have defined. The pipeline status is also displayed by GitLab under the “pipeline” field in CI/CD section. We can even rollback the changes if anything fails and if need be. Also, we will be creating all the required environment secrets such as Docker Authentication token, SonarCloud authentication token and kubeconfig files under settings -> CICD -> Variables.
GITLAB Pipeline stages of our application

The application is a Java Springboot application which uses Gradle for compilation and unit Testing, SonarCloud for source code analysis, Docker for creating a container image, AWS for hosting the Kubernetes cluster and helm charts for Kubernetes deployment.
Below table describes the different DevOps tools we are using here and its function.
| Tool Name | Function |
| GitLab CI | CICD tool |
| Gradle | Compilation and unit testing |
| SonarCloud | Code coverage and code analysis |
| Docker | Containerize the application and creates an image |
| DockerHub | Docker image repository |
| AWS | Hosts the application in cloud |
| Kubernetes | Deploy the image in the server in the cluster as an application or a micro service |
| Helm | Image (Package Manager) to orchestrate the k8s deployment |
Build Stage
In this build job, we do a compile and perform unit test using gradle commands. We are also creating an artifact and we are setting expiration as 1 week. That means, the artifact will be available for 1 week after which it will be deleted from Gitlab’s workspace. We use this artifact to pass it as the workspace to the next jobs such as SonarQube analysis and Docker build and push jobs.
buildJob:
  stage: build
  image: openjdk:11-jdk
  script:
    - echo "Doing a gradle build."
    - chmod +x gradlew && ./gradlew build jacocoTestReport
  artifacts:
    paths:
    - build/*
    expire_in: 1 week
The output of the build stage is shown below:

Code Analysis Stage
After compilation stage is passed, it moves to the source code analysis stage using sonar cloud. We pass the required parameters for the sonar scanner. Note that we are generating the auth token from the sonar cloud and creating the environment variable called SONAR_AUTH_TOKEN and passing it for the sonar.login argument.
sonarqubeJob:
  stage: sonarqube
  image: sonarsource/sonar-scanner-cli
  dependencies:
    - buildJob
  script:
    - echo "Doing a sonarqube scan"
    - sonar-scanner -Dsonar.projectKey=samplespringbootapp -Dsonar.sources=. -Dsonar.login=${SONAR_AUTH_TOKEN} -Dsonar.organization=kaviyaorg -Dsonar.host.url=${SONAR_HOST_URL} -Dsonar.java.binaries=build/classes/java/main

Containerization Stage
In this stage, we are creating a docker image and then tagging the image it with the required name and publishing it to the docker hub. Please note that we have pushed the image created to a public repo but in real world scenario, the created images will be published to the privately hosted repos. Also, we have passed the artifacts from the build stage to this stage as a dependency.
The before script argument is used to specify steps to do before the execution stage. Here, we are logging into the docker hub using the repo name and docker authentication token before doing a docker build and docker push.
dockerBuildAndPushJob:
  stage: dockerBuildAndPush
  image: docker:20.10.16
  dependencies:
    - buildJob
  before_script:
  - docker login -u $DOCKER_REPO_NAME -p $DOCKER_AUTH_TOKEN
  script:
    - echo "In docker build stage"
    - docker build --tag "${DOCKER_REPO_NAME}/${CI_PROJECT_NAME}:${CI_COMMIT_SHORT_SHA}" --tag "${DOCKER_REPO_NAME}/${CI_PROJECT_NAME}:latest" .
    - echo "In docker push stage"
    - docker push ${DOCKER_REPO_NAME}/${CI_PROJECT_NAME}:${CI_COMMIT_SHORT_SHA}
    - docker push ${DOCKER_REPO_NAME}/${CI_PROJECT_NAME}:latest
The output of this stage is shown below:

Deployment Stage
We are going to use the Kubernetes cluster deployed in AWS using KOPS by referring our previous blog which is based on the official KOPS documentation.
We have two jobs for the deployment. One deploys to the Dev namespace in the kubernetes cluster and the next job will deploy to the “prod” namespace in the cluster.
We are using helm charts to deploy to kubernetes. Here is the official documentation for Helm installation. Inside the templates folder, there is one deployment.yaml file that will deploy the image to the cluster by creating a pod. Also we have a service.yaml file which will expose the pod to the port 8081. Please note that, in the service.yaml file, we have used the type LoadBalancer which will make use of the internal load balancer type provided by the cluster hosting solution, which is AWS in this case. Thus, we can see an Elastic Load Balancer (ELB) is created after the deployment.
What are helm charts and their advantages is perhaps a topic for another article 🙂 We have also committed the kubernetes.yaml file for reference if you want to deploy without the helm charts.
The commands to create namespaces are below:
kubectl create namespace dev
kubectl create namespace prod
Deployment to Dev Namespace
The deployment to Dev job will deploy to the dev namespace and the values required to deploy are coming from the values_dev.yaml file. We also export the kubeconfig file from the kubernetes cluster as a GitLab environment variable and exporting the value before the script execution using the before_script field. We do a helm upgrade while pointing to the location of the template files and which values.yaml file it should refer for the parameters.
Below is the code snippet for the deployment to dev job.
deployDevJob:
  stage: deploydev
  #image:
  #  name: bitnami/kubectl
  #  entrypoint: ['']
  before_script:
    - export KUBECONFIG=$KUBECONFIG
  #script:
  #  - kubectl apply -f kubernetes.yaml
  image:
    name: alpine/helm:3.2.1
    entrypoint: ['']
  script:
    - echo Deployment to Dev Region
    - helm upgrade ${APP_NAME} ./mychart --install --values=./mychart/values_dev.yaml --namespace=dev
Below is the console output:

The application can be accessed by the AWS ELB url that is created automatically and appending port 8081 to it. Below is the output for the same.

Deploy to Prod Namespace:
This job deploys the docker image to the prod namespace of the k8s cluster in AWS using helm.
This deployment job executes only for the main branch as part of release strategy
The kubernetes deployment file will be passed from helm templates folder. The values for the deployment and service will be passed during run time using values_prod.yaml file in helm folder.
Below is the gitlab code for the deployment to prod job.
deployProdJob:
  stage: deployprod
  #image:
  #  name: bitnami/kubectl
  #  entrypoint: ['']
  before_script:
    - export KUBECONFIG=$KUBECONFIG
  #script:
  #  - kubectl apply -f kubernetes.yaml
  image:
    name: alpine/helm:3.2.1
    entrypoint: ['']
  script:
    - echo Deploy to Prod
    - helm upgrade ${APP_NAME} ./mychart --install --values=./mychart/values_prod.yaml --namespace=prod
  rules:
    - if: $CI_COMMIT_BRANCH == "main"
Below is the console output for the deployment.

The application can be accessed by the AWS ELB url that is created automatically and appending port 8081 to it. Below is the output for the same.

Conclusion
We have reached the end of this article. Here, we learned how to integrate an application from end to end using gitlab and there by enabling CICD with ease. We can see how easy it is to integrate different tools with Gitlab and how simple is its YAML based CICD file.
Once again, all the codebase used in this article is available here! Feel free to fork and work on it and get your hands dirty! Please share your thoughts, questions and suggestions in the comment section below.
Please subscribe to our blog to stay up to date on any new articles!